

It is now the season for the Incredible Hulk and each week I seem to get another email from a friend who is planning a trip. I’ve got a lot of info scattered around Dream In Vertical but think that it should all go in one place. Feel free to leave comments/corrections so that I can update this page! First off a short PSA.
To future climbers of the Incredible Hulk:
I’m pretty passionate about the outdoors and one thing that is very important is stewardship. There are a limited number of places to climb and even fewer that sit in the wilderness. Over the last three seasons (2009-2011), I have seen a drastic increase in traffic at the Incredible Hulk. With such an increase in traffic it is very important to respect the area and take care with our impact. Please take a second to read this thread from one of the Yosemite Climbing rangers about climbing at the Hulk.
http://www.supertopo.com/climbing/thread.php?topic_id=932980
It is important to respect the Incredible Hulk and make sure to use the bathroom well outside of camp and away from any water sources. Pack out all of your trash and hang your food in camp or bring a bear canister. The many rodents, mice and marmots would be more than happy to chew through your tent or pack for food. I’ve even seen rodents eat foam on packs and destroy climbing shoes that were left out.
Also, you need a permit to camp at the hulk. Check out the logistics section below for specific information.
Guidebooks:
High Sierra Climbing Supertopo by Chris McNamara
This is the best guidebook for the majority of people climbing at the Hulk. There are great topos for Red Dihedral, Positive Vibrations and Sun Spot Dihedral. It has decent approach beta and information about the area. The Hoover Wilderness sign, mentioned in the supertopo approach beta, has moved, which makes those directions less helpful. There is detailed approach beta listed below.
The High Sierra: Peaks, Passes and Trails by R.J. Secor
This book is more of an informational guide to the Sierra then a true guidebook. It does have information about the majority of the climbs on the Incredible Hulk but only has written pitch descriptions and a photo overlay topo. The information in the Secor guide is best used in conjunction with actual topos for the routes.
Hulk topo from the Secor Guide (from Google Books)
MountainProject.com
While this is not a physical guide, there is a wealth of information on Mountain Project for almost all of the “trade” routes on the Hulk. This is also one of the best places to find topos for routes that are not included in the Supertopo guide.
Hulk Topo – Upper Pitches
Logistics:
The Incredible Hulk is located in the Hoover Wilderness, which requires permits for overnight stays. Make sure to go to the Bridgeport ranger station and get a permit. Permits are for camping in the wilderness and are limited to 8 entries per day for Little Slide Canyon, the trail head used to access the Hulk. This does not limit the total number of climbers that may be camping at the Hulk, but no more than 8 people can hike in on a given day. The ranger station opens at 8am and the permits are free. You can reserve permits in advance by sending in a form (advanced reservations cost $3 per person). Plan to arrive in Bridgeport early on holiday weekends since the permits do fill up – I saw this happen by 9am on Saturday of Labor Day weekend in 2010. Tickets are pretty pricey at $175 per person for camping without a permit.
Permits are not needed if you are doing routes on the Hulk Car to Car. No fires are permitted in Little Slide Canyon or anywhere else in the “Sawtooth zone”.
Bear canisters are required as of Spring of 2012 anywhere in the Hoover Wilderness. This means it is no longer ok to hang food at the Hulk.
In order to leave your car at Mono Village you will need to pay for a parking permit. It’s $10 for up to 30 days of parking. The attendant who takes your money will let you know where to park. Most often you go to the special “backpackers” lot down by the lake. There are often bears present at the campground so you don’t want to leave any food or smelly items in your car.
There is a seasonal stream for water that usually lasts until late August at the bivy are below the base of the Incredible Hulk. During especially snowy years you have to hike further since the creek is under 5 feet of snow. There is sometimes a season lake and if you hike a bit further up canyon you can fish in the bigger lakes, such as Maltby Lake.
Approach:
GPS Track of the hulk approach (surely overkill!)
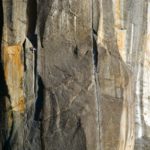
The approach covers about 5 miles and gains around 3,000 feet until the bivy areas near the base of the Hulk. You start on the Barney Lake trail that leaves from the Mono Village Campground. It can be a bit tricky figuring out the start of the trail in the dark. Once on the main hiker trail, travel 2.25 miles to a big rock, shown in the photo below, which is on the left side of the trail.
Konstantine points to the river crossing
Follow a rough trail through a meadow to the creek and go down stream until you find three large logs that cross the river. Cross on the furthest down stream of the three logs and hike upstream, on the other side, until you reach an exposed hill (See red arrow below). Here you follow steep switchbacks, still trending upstream, until you hit the forest. There should be a number of cairns on this section even though it is a newer trail (see red line below). The older/ low water trail (Shown in blue) uses a set of logs that is further up stream to cross the river and stays in the marsh before heading up a different section of steep hill. The two trails join up when the terrain becomes rockier. The red trail is well used and cairn-ed and has become my preferred approach.
After the log crossing head up the steep hill under the red arrow
Once in the trees you are still hiking up hill but are perpendicular to the first creek and now paralleling Little Slide Canyon (on the left side). When you reach the talus it’s pretty easy going until you are forced to cross the creek in the middle of Little Slide Canyon. Now on the right side head up a steep section of talus, enjoying views of many water falls before the trail turns entirely to steep talus.
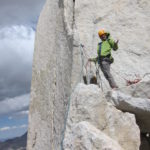
Jamie checks out the steep talus on the approach.
Lizzy is almost done with the steep talus.
Once at the top of the talus you continue trend towards the Hulk (left side of the valley) and the best path goes up about 50 feet of 3rd class benches. This leads to another gulley, often filled with snow, that finally leads to a flat section below the talus field at the base of the hulk. The route finding at the end can be hit or miss depending on snow coverage and the existence of cairns. It’s easy to do go up and towards the Hulk!
Version 2.0 of a the Hulk Photo Topo. Click for full size!
Routes:
Routes are listed left to right.
Blow Hard – 5.12 +, Peter Croft, Andrew Stevens and Hans Standteiner 2004
Beta on MountainProject
The Polish Route – 5.10+, Rick Wheeler and Bob Harrington 1976
Beta on MountainProject
Climbers on the Polish route Photo via Summit Post
Escape from Poland (Variation) – 5.10+, Dave Nettle and John Fehrman 1998
PDF Topo
Solar Flare – 5.12+, Peter Croft and Conrad Ancher 2009
Peter Croft and Conrad Anker climbing Solar Flare from Jeffery Morse on Vimeo.
Rough Solar Flare Topo from Summit Register via Vitaliy M.
Sun Burn (Variation) – 5.12-, Peter Croft and Dave Nettle 2004?
According to the Secor guide Sun Burn starts on Airstream but then goes left before Airstream intersects with Sun Spot dihedral. Eventually you work far enough left to reach Solar Flare and you can finish up on that route. I believe this skips one or two 5.12/5.12+ pitches on Solar Flare, while still granting access to the crazy arete on the left of the orange feature known as the Sunspot. See photo topo at the beginning of this post.
Sun Spot Dihedral – 5.11b, Dave Nettle and Jimmy Haden 1999
The bottom pitches of Airstream can be used as an alternate start to add two more pitches of 5.11. The routes join up at the spooky slab after the undercling traverse on Sunspot.
PDF Topo – via RedRocksGuideBook.com
Airstream – 5.13, Peter Croft, Dave Nettle and Greg Epperson 2004
Topo – via Supertopo Obscurities
FA history in the American Alpine Journal by Peter Croft
Positive Vibrations – 5.11a, FA Bob Harrington, Bartlett 1981. FFA Dale Bard, Lyde 1986
There is an alternate start to the right of PV called the Power Ranger Start. It’s 40m long mostly bolts and 5.11+. After the first pitch you can take the 2nd pitch of PV to get to the terrace.
The Venturi Effect – 5.12+, Peter Croft and Dave Nettle 2004
FA history in the American Alpine Journal by Peter Croft (same article as Airstream)
PDF Topo via Supertopo Obscurities
Tradewinds – 5.11+, Dave Nettle and Nils Davis 2006
Topo on Mountainproject
Astro Hulk (Variation) – 5.11, Dave Nettle and Mike Davis – 1996
Topo on Mountainproject
FA history by Mike Davis
Eye of the Storm – 5.12, Nils Davis, Brent Obinger and Johnny Copp 2007
FA history by Nils Davis
Eye of the Storm Topo (Click for fullsize)
Red Dihedral – 5.10b, Bard-Farrell-Locke, 1975
PDF Topo via Supertopo
Lost in the Sun – 5.12a/b, Luke Stefurak, Casey, James, Jonathan and Keith 2011
FA history by Luke Stefurak
Photo Topo via Mountainproject
Beeline – 5.10-, Dave Nettle and Glen Poulsen Sept 2009
Topo via Mountainproject
I’ve still yet to find a real topo for Solar Flare or Blow Hard. I think one of them may be in the summit register.If you have a topo for these routes please leave a comment!
Descent:
All routes that reach the true summit (not just the first ridge) share the same descent. You must scramble down 300 feet of 3rd and 4th class to a single rope rappel ~75 feet. The rap station, which consists of two bolts, is right on the back edge and there is a huge cairn that marks the place you must turn left to head towards it. It is possible to down-climb off to the side at 5.5 or so but this is not recommended since the rock is loose and the fall catastrophic. After reaching the ground you descend the South/West gulley. In early season this gully, or the larger one further down may have snow in it. Once halfway down the first gully stay left and downclimb under a boulder, the other fork may look appealing but cliffs out. 5-10 more minutes of talus put you in the large gulley that is on the right (South) of the main face of the hulk. 30-45 minutes will get you back to base camp. This is best done in approach shoes since the talus is steep and loose. See red line below.
Rough location of the Venturi Raps (not all stations shown)
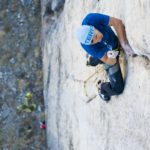
Rappelling:
Positive Vibrations.
You can rappel the route from anywhere up to the belay before 6th Pitch (crux) with a 70m rope. After this point you need to continue to the first major ridge. There is a piton and nut anchor on the ridge that allows you to rappel down (30+ meters) to the ledge shown in green in the photo above. Follow the directions below.
The Venturi Effect/Tradewinds/Astro Hulk
From the ledge (shown above as a green line), which runs across the Hulk approximately one pitch below the summit ridge, you will find two fixed nuts with slings and biners. Rap 30-35 feet to two bolts. Do a single 32+ meter rap (70m rope). From here rap with two 70m ropes skipping every other belay. I have done this twice and have yet to get the rope stuck. You can also rappel with a single 70m rope skipping the optional single bolt belay on Venturi Effect and the PV belay (P5) at the bivy ledge (one ring bolt + one old bolt). I’ve done this as well. The worst pull is when you are in the chimney, P3 or P4 on PV. With a single 70m rope you will need to swing climbers left (towards sunspot) from the two bolt anchor atop pitch 2 of PV (aka the Terrace) to a two bolt rap station that is about 10 feet below the P1 “spike” belay on PV. This off route station allows you to rap to the ground with a single 70m rope. It takes a 80m rope or longer to rap to the anchors atop the Power Ranger start to the ground. It’s a full 70m from the Terrace to the ground. It’s possible to rappel with two 60m ropes from the Terrace (P2 anchor of PV) if you are willing to downclimb about 10 feet of 4th and easy 5th.
You can also rappel Tradewinds or Astro Hulk with two 60m ropes. This is not recommended since it is easier to get the rope stuck at various places on those routes. Also, the slings and rap rings are not in as good of condition as the ones on the Venturi Effect.
Sunspot Dihedral/Solar Flare
From the left side of the Hulk you can rappel down Solar Flare with one 70m rope or rappel down on Sun Spot Dihedral with two ropes (only until the 6th pitch). The PDF Topo for sunspot has good beta for these rappels.
Airstream
I saw a pair of climbers rappel down this route from the top of the 7th pitch. It seemed like they had two ropes. The anchors are bolted up to pitch 7 but I’m not sure the state of the the rappelling hardware (rings,slings,etc). One option (if you get high enough, would be to rap left to Solar Flare and go down that route with an 80m rope. I haven’t done this, but it seems to be possible)
Blow Hard/Polish Route
I believe you can rappel off either of these routes with a 80m rope. According to MountainProject you rappel Blow Hard until the base of the crux pitch. Then you rappel around the corner to the gulley on the back side of the hulk. I believe that you can also rappel into the gulley from the end of the polish route (ie the Polish Tower?), since that was how it was done on the FA. I believe this requires a few more rappels or perhaps two 60m ropes.
Red Dihedral/ Lost in the Sun
The Red Dihedral has no bolted anchors but there are many bail slings present in the lower pitches. There are slings around a flake at the base of the Red Dihedral pitch. From here it looks like there is occasional tat that will get you down in the case of a storm. This is not recommended. If you must bail it’s better to climb to the end of the Red Dihedral pitch. On the next pitch you can climb up a little 10-20 feet and then traverse about 60 feet straight right. You will do about 10 feet of downclimbing to get to the P5 anchors on Lost in the Sun which is setup rappelling.
Lost in the Sun can be rappelled with an 80m Rope or two ropes. Anchors should be easy to find and you will skip the P2 anchor since it is way off to the side. Exact rappel distances are on MountainProject.
Enjoy!
Luke